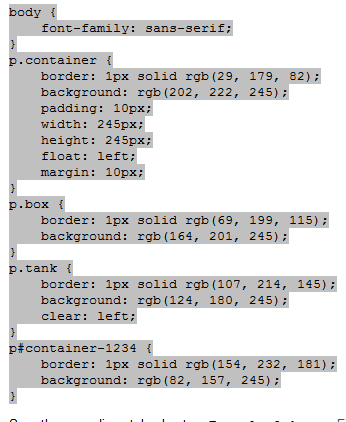
Tuesday, January 31, 2012

CSS: The Universal Selector


By Richard York

The universal selector is an asterisk. When used alone, the universal selector tells the CSS interpreter to apply the CSS rule to all elements in the document. Figure 3-12 shows what a universal selector looks like.

Figure 3-12
This rule is applied to all elements contained in the document. The universal selector applies to everything, including form input fields and tables of data. It applies style to any and every element present in a document.
Try It Out-The Universal Selector
Example 3-2. To see how the universal selector works, follow these steps.
  1. Enter the following markup into your text editor:

    1. Save the preceding document as Example_3-2.html and load it into your favorite browser.
    2. Enter the following CSS into a new document in your text editor.
      
      body {
          font-family: sans-serif;
      }
      * {
          border: 1px solid yellowgreen;
          color: green;
          padding: 5px;
          font-weight: normal;
          font-size: 12px;
      }
      
    3. Save the preceding styles as Example_3-2.css. After loading Example 3-2 into your browser, you should see output similar to that of Figure 3-13.

      1. Figure 3-13
      Tip 
      Figure 3-13 shows the results from Mac Firefox. Safari 2.0 produces similar results; the difference being only the font color is applied to the form elements. Safari 2.0 does not support custom styling of form elements very well. However, later versions have made progress in this area. IE 6 and IE 7 also differ slightly from the output here, in that the elements are missing the top border, which is because of a bug in IE. While the results are not perfect from browser to browser, you get the idea of what the universal selector does.

      How It Works
      The concepts at play in Example 3-2 are very simple; the universal selector is included in the style sheet as an asterisk. The declarations in the rule that follow the asterisk are applied to all of the elements that appear in the document, provided that element is allowed to have the property in question applied. For instance, the and elements do not accept most visual styles (borders, padding, and dimensions, for example). The universal selector, alone, doesn’t have much practical application, although as previously mentioned, it can be helpful for debugging styles and highlighting element dimensions in complex documents. By applying a border to all elements, you are able to immediately see the space an element occupies.

      The universal selector can also be used with other kinds of selectors, such as contextual selectors, also known as descendant selectors.

Monday, January 30, 2012

There should be some other way


We all know about noise pollution in Dhaka city. Recently one pollution, irritation and pain increased terribly. Let me explain. Recently apartment business is going very well in Dhaka city. Who had land previously with old or small home they are selling their home to the builders. And builders making flats on that plot. Things are very normal. So, if you are living in the city, every plot around you are started their construction work. Now about the noise, everyday you had to hear continuously these construction noises. Men go out to work, this pain especially for women and children. We had no way but to tolerate these noises. But the noise of tiles cutting is too loud. No one can stand it. But for every floor and for every building you had to tolerate this. This sound is some time making pain in ear. I wish there is some other way to remove this sound, some other way to cut all tiles. This is not good or acceptable for any child.

Sunday, January 29, 2012

CSS: Implement of Out-Class and ID Selectors


By Richard York
Implement of Out-Class and ID Selectors

Example 3-1. To see how class and id selectors work, follow these steps.

Enter the following markup into your text editor:
  1. Save the preceding document as Example_3-1.html.
  2. Enter the following style sheet into your text editor:
    1. Save the preceding style sheet as Example_3-1.css. Figure 3-11 shows what Example 3-1 looks like when rendered in Safari. You should see something similar in Firefox, IE 6, IE 7, and Opera.
      How It Works
      In Example 3-1, you put your newly acquired class and id selector skills to use. The following is a rule-by-rule review of the relevant class and id styles you applied in Example_3-1.css.
      First, you created a rule that is applied to all four
      elements, since all four
      elements have a class name of container. You were able to select all four elements because each
      element in the document has a container class name in the value of the class attribute that appears on all four
      elements.
      Since the preceding rule applied to all four
      elements, it set common properties such as dimensions using the width, height, padding, border, and margin properties. just examine how the p.container selector is working to select the elements, rather than the actual styling being applied.
      In the next rule, you selected the next
      element that also has two class names, box and container.
      Although you could have chained the class names in the style sheet by using the selector p.container .box, you avoid doing this since there are known problems with this approach in IE 6. IE 6, on the other hand, supports just fine multiple class names in the class attribute. Referencing just the box class name allows you to select the element, too. You give the element a slightly richer shade of light blue, and a slightly lighter green border than was specified in the previous rule, which referenced all four
      elements by the class name, container. You see that the background and border declarations set here overrode the previously set background and border declarations in the first container rule
      In the next rule, you set properties on the
      element with both the class names container and tank. Again, you gave the element an even richer light blue background (compared to the last rule, which was applied to the
      element with container and box class names).
      In the last rule, you used an id selector to select the fourth
      element, which has an id attribute set with a value of container-1234. For the fourth
      element, there is an even richer still light blue background, and an even lighter green border around it.


Friday, January 27, 2012

CSS: ID Selectors


By Richard York

id selectors are unique identifiers; an id is meant to be unique, defined once per document. Like class selectors discussed in the previous section, a special character precedes id selectors in a style sheet. To reference an id, you precede the id name with a hash mark (or pound sign, #). Like class names, this name cannot contain spaces. You should use names that only include letters, numbers, and spaces for compatibility with the older browsers. You see how this is done in Figure 3-8.
Figure 3-8 
Since there’s only one Jupiter in the solar system, Jupiter lends itself as a good example of the concept of an id selector. Just as there is only one Jupiter in the solar system, the id name jupiter can be used only once in a document, on one element.

Browsers are forgiving of multiple id names per document as far as style sheets are concerned. However, using an id name more than once in a document can cause conflicts with other applications of unique id names. For example, id names can be used to link to a location within a document (as HTML anchors), or when referencing an element by id name from JavaScript. When you have an id name appearing more than once in the HTML document, on more than one element, the browser won’t know which one you’re linking to, or which one you want to refer to from JavaScript, and will have to guess. It’s best to just use the id name for its intended purpose, just once per document.

An id name must be unique in so far as other id names are concerned. An id name may be repeated as a class name, should you want to do so.

The element can then be defined in the document using the id attribute. This is demonstrated in Figure 3-9.
Figure 3-9 
You can make both class and id selectors more specific by appending the name of the element to the beginning of the selector. For instance, if in the last examples you only want
elements for each rule, the selector will look like what you see in Figure 3-10.
Figure 3-10 
Now each rule is applied only to
elements that contain the corresponding class and id names. You may wonder why this is useful for an id selector, since an id element has to be unique in a document. Appending the selector with the type of element is useful in situations where one style sheet applies to more than one HTML document, where it’s possible that you have a unique id in one of those documents that applies to for instance, an element, but in another, separate document, that unique id name applies to a
element. Of course, it’s best practice to avoid situations like that by making each element’s id name unique, even in different documents, to avoid confusion. Sometimes, it can’t be avoided. The other reason this is useful is that it makes the style sheet more intuitive and easier to fol-low. When you are reading a style sheet and see the id name jupiter but no type selector, that id can apply to any element in the document and would require you to scan the whole document from top to bottom without any other search criteria. With the type selector appended, you can narrow the search; if the element is a
element, then you know that the id selector doesn’t apply to images, links, paragraphs, and so on.

Although the id must be unique, in these examples you can name only one element jupiter. The CSS style sheet, however, may contain as many references to that id as are necessary. The uniqueness rule only applies to naming the elements, not the references to them. You can apply classes, on the other hand, to as many elements in the body as necessary.


Thursday, January 26, 2012

My son couldn’t stop himself shouting


Shafeen, my son (3 years old)

I don’t shout. No matter what happens. It’s my nature. And I don’t like shouting. No matter who shouts on me, I don’t shout in reply, never with my in laws, office colleagues or with other people. Recently my maid started shouting with me regularly, why room is too narrow, why we have extra things in house, why my son keep toys on floor etc. My nature is calm as usual. But my son couldn’t tolerate that other person is shouting with his mom, so with his language (like aa uu) of scolding, he shouts on her (my maid) and stop her. On that time he was sitting on my lap. I love my son. At least I found one person beside, who really cares for me.

Tuesday, January 24, 2012

CSS: Class Selectors


By Richard York

Class and id selectors are the most widely supported selectors. There are two types of selectors. The class attribute is more generic, meaning it may encompass many elements in a given document, even elements of different types or purposes. On the other hand, you can use the id attribute only once per document. The name id tells you that the id must be unique. Besides using it in CSS, you can also use an element’s id to access it via a scripting language like JavaScript. You can also link to the location of the element with an id name using anchors. Anchors are appended to URLs to force a browser to go to a specific place in a document. So the id attribute serves more than one purpose. Think of it as an element’s address inside a document - no two addresses can be the same. The discussion continues with class selectors.

Class Selectors
Figure 3-1 is an example of a class name selector.


Figure 3-1
The class name selector begins with a dot, followed by the class name itself, which you choose. Typically, the class name is comprised of letters, numbers, and hyphens only, since this provides the best compatibility with older browsers. Class names also cannot include spaces. In Figure 3-2, you see the element that the class name planet applies style to in the HTML document.


Figure 3-2
The dot appearing before the class name in the CSS rule tells CSS that you are referencing a class selector. The dot does not need to appear in the class attribute value itself; in fact it cannot, because the value of the class attribute is just the class name itself.

When used in this context, the type of element doesn’t matter. In other words, you can also apply the class to other elements, as is illustrated in Figure 3-3.


Figure 3-3
The same rule applies to the element as applies to the
element. Both now have an absolute position, offset from the top zero pixels, offset from the left of zero pixels, and offset from the bottom of 15 pixels. What if you wanted to give both the
and element the same class name, but have a style sheet rule that applies to
elements, but not elements? You can do that, too. Limiting a class selector to a type of element is demonstrated in Figure 3-4.


Figure 3-4
In Figure 3-4, you see the combination of two types of selectors that you are already familiar with, the type selector from Chapter 2, and the class selector. When you append a type selector to a class selector, you limit the scope of the style sheet rule to only that type of element. In Figure 3-4, the rule is limited so that it only applies to
elements, causing it to no longer apply to elements, or any other type of element for that matter. You can still create additional rules that reference other elements, such as a new rule that only applies to elements with a class name of planet, such as img.planet, but the rule that you see in Figure 3-4 applies exclusively to
elements with a class name of planet.

Elements can also be assigned more than one class name. Figure 3-5 shows an example of this.


Figure 3-5
The value of this class attribute actually contains two class names: planet and jupiter. Each class name in the attribute is separated by a space. In the corresponding style sheet, the two classes may be referenced by two separate rules, as illustrated in Figure 3-6.


Figure 3-6
The two style sheet rules in Figure 3-6 result in the
element with both planet and jupiter class names receiving the declarations of both rules.

The class names may also be chained together in the style sheet, as shown in Figure 3-7.


Figure 3-7
The preceding rule applies only to elements that reference both class names in their class attribute.

IE 6 interprets chained class names per the CSS 1 specification, which did not allow chained class names in the style sheet. In IE 6, only the last class name in the chain is recognized. In the preceding example, IE 6 would interpret the .planet.jupiter selector as .jupiter only. This has been fixed in IE 7.

Whereas classes are meant to reference more than one element, ids are meant to reference only one ele-ment in a document.

Monday, January 23, 2012

1st thought


When I was the student of Dhaka University, one of our teacher was professor, Lutful Haque. Once he told us in the class, human’s second thought is always correct. Because first when they take decision was in a hurry, second time they think more and look at all negative and positive things. So, second decision is always correct. But for myself, I have seen always, that my 1st decision was correct. Whenever I changed my decision I had to pay a lot. Every pain reminds me that my 1st decision was correct. So, I myself made a promise that whenever I decide something (may be in anger or any other mood) I will try to keep that unchanged. And I hope this will give me good result. 

CSS: Inline Styles

By Richard York
The last method for including CSS in a document is from within the XHTML elements themselves. Sometimes it doesn’t make sense to clutter your external or embedded style sheets with a rule that will be used on only one element in one document. This is where the style="" attribute comes into play; it’s demonstrated by the following markup:

This method allows for the text to be formatted from within the document and may be applied to any rendered element.
The following Try It Out demonstrates how the style attribute is used to add styles directly to the elements of a web document.
Try It Out-Including CSS Using the style Attribute 
Example 2-10. To use the style attribute to apply styles directly to the elements of a document, follow these steps.
  1. Return to your text editor and enter the following XHTML:
    1. Save the preceding document as Example_2-10.html
    2. Load up Example 2-10 in your favorite browser. You should see output like that in Figure 2-6.
    How It Works
    Note that the output is identical to output of the earlier example shown in Figure 2-6. The style attribute allows CSS declarations to be included directly in the XHTML element. The style attribute, however, is not as dynamic as a style sheet. It gives you no way to group repetitive rules or declarations. The style attribute should only be used when a more efficient method is not available (if, for example, the element to be styled does not appear on multiple pages).

Saturday, January 21, 2012

Home decoration


Painting on door

Drawing on table

wall decoration

Design on weardrop

My son (3 years old) likes to work a lot. He named those as his work. He doesn’t allow any body to do his work. Like, if I use the microwave oven, his job is to press the ‘cancel’ button after completion of my work.  His recent work is home decoration. He decorated walls, floor, table, ware drop with his new color pencil, given by my elder sister (Sharmin) at his birthday. If you like the design, you can order for your home too.

Friday, January 20, 2012

CSS: Importing Style Sheets


By Richard York
You can also link to an external style sheet by using the @import rule. Here’s a demonstration:


This example uses the method but includes the @import notation. It’s very straightforward: Plug in the @import rule followed by the url(), which may contain an absolute or relative path.
Tip 
The @import method is not supported by older browsers, and it is sometimes used as a hack to hide styles from browsers that would crash horribly if these styles were present. One such browser is Netscape Navigator 4, which has horrible CSS support and has been known to lock up when certain styles are present.

Need good geometric design for international trade fair stall placement


Shafeen (my son) at trade fair 2012


January month became a month of joy of shopping because of International trade fair. Everyday lots of people go there to see new items, old item with good offer, lottery, for business purpose etc. It’s a huge area with lots of stall and pavilions. Everywhere you will find food corner and a place for new born child and mother care. Where moms can breast feeding and change their child’s diaper and also can buy some product for their child’s nutrition. It has a place for blood donation too. Now it has bank and ATM booth too.

But still there are some draws back. Like no matter how hard you try you will never able to see all stall and pavilion. Not because of its size, because of its placing decoration. I think it should had one road moves like zigzag or like snake trace, if you like to follow that road you will be able to visit or at least will walk in front of all stalls and pavilion. Then every stall and pavilion will have fare opportunity.  So, if anyone wants to follow that road can go with it or can go with their own choice.

Wednesday, January 18, 2012

CSS: How to Structure an External CSS Document


External style sheets are essentially the same thing as embedded style sheets; the key difference is that no markup exists in a CSS file. When you create an external, independent CSS document, it must be created using the .css file extension.
An external CSS document may contain nothing but CSS rules or comments. A CSS document cannot contain any markup; see how this is done in the following Try It Out.
Try It Out-Linking to an External Style Sheet
Example 2-9. To link to an external style sheet, follow these steps.
  1. Enter the following XHTML document:
    1. Save the XHTML document as Example_2-9.html.
    2. In a new document, enter the following CSS:
      h1, h2, h3, h4, h5, h6 {
      font-family: sans-serif;
      color: maroon;
      1px solid rgb(200, 200, 200); }
      border-bottom:
    3. Save the CSS as stylesheet.css in the same folder that Example_2-9.html was saved in.
    4. Load up the document in a browser. You should see output that looks like Figure 2-6.
    How It Works
    The embedded style sheet between the tags has been replaced with an external style sheet by placing the rules inside the embedded style sheet into their own document, saving that document with a .css file extension, and then linking to the new file by including the element in the XHTML document. One of the benefits of an external style sheet is that it allows the same style rules to be applied to as many documents as the author wishes. This is one of the key benefits of CSS-based design. An external style sheet offers flexibility to the author that saves both time and resources.

Tuesday, January 17, 2012

Time management


Shafeen and me


Don’t know, when I will ever get enough time for everything, may be after my death, in grove. I could never finish my work as I wanted only because of time. Now even I couldn’t complete online work as I wanted because of time. My son is fully depending on me. So, he is my first priority. Then work. So, I had to wait when he (my son) allows me to work. After my son, my husband’s turn comes, though he don’t say directly about giving him time, but he wants so. And I also agree, as a husband, he deserves attention from his wife. So, I make time for him (including cooking or doing other things for him). Then come my turn. After giving full attention to those people, and trying to do everything perfect for them, does any time remains for me? NO. Allah knows when I could ever manage some time for me too.

CSS: Linking to External Style Sheets


By Richard York

The authors of CSS recognized that HTML-template creation is a common need. As such, the W3C body made recommendations that allow external style sheets to be included in a document from within HTML or XHTML by use of the element or from within a style sheet itself using the @import rule. External style sheets are the preferred method of CSS inclusion in a web document. External style sheets can be cached by the user’s browser. This frees the user, who no longer needs to download the web page or website’s style sheet on every page request. This also ensures that documents load very quickly, which is another feature of CSS that conserves expensive bandwidth.
Here’s a demonstration of the element method:
The following attributes are required to use the element for linking to a CSS document:
An absolute path means the complete path to the file. For instance, http://www.example.com is an absolute path. A relative path triggers the application to find the document relative to the requesting document. So if the example file’s URL is http://www.example.com/example.html and the CSS document is stored in the stylesheets directory as stylesheet.css, the relative path included in is stylesheets/ stylesheet.css and the absolute path to the document is http://www.example.com/stylesheets/stylesheet.css or /stylesheets/stylesheet.css.
A style sheet is really easy to set up

Sunday, January 15, 2012

International Trade fair 2012, Bangladesh


Shafeen, watching the trade fair from Banglalion wimax pavilion.


Shafeen at Dhaka International Trade Fair 2012

Shafeen wanted to see fish inside the water beside Bestware pavilion at International Trade Fair 2012

I liked to visit and buy things which I need in suitable price may with some gift or lottery offer. I went there for 2 times this year, still a lot left to see, especially, maggy and tatka pavilion, where I wanted to go this year. I wish I could manage to go there one more time. But I know transport cost is very high. I shouldn’t think to go there anymore.

Saturday, January 14, 2012

Including an Embedded Style Sheet


By Richard York

You use the tag set to include embedded style sheets directly in the document. You can include HTML comment tags if you want to hide style sheet rules from non-equipped browsers. Since HTML’s early days, HTML has supported the capability of adding comment text to a document. Comment text gives the web author the ability to add notes to a project so he can recall why he did something in a certain way or to mark the sections of a document. In HTML, you add a comment by typing a left angle bracket, an exclamation mark, two dashes, at least one space, and then the comment text itself. You close the comment by typing at least one space, two more dashes, and the right angle bracket. Here’s what a comment looks like:


In the context of an embedded style sheet, comments have a special meaning. Because they appear inside the tags, they tell browsers that don’t support CSS to ignore the text that appears between them. Modern CSS-equipped browsers, on the other hand, read the sequence of
Older browsers simply ignore any CSS rules defined inside the HTML comments.
For the

Wednesday, January 11, 2012

Biscuit


Shafeen, my son (3 years old)


Generally I don’t like biscuit. This is the last food that I take, when I had nothing else to eat. Like, when I feel hungry and don’t get any time or energy to prepare my food. My elder sister Sharmin likes biscuit a lot and my son Shafeen (3 years old) too. When we go outside and I don’t have time to make any food for my son, I took the tin of biscuit (I keep some biscuit in my tin for emergency always) and whenever he felt hungry he took 2 biscuits and water.

Tuesday, January 10, 2012

CSS: Including CSS in a Document


By Richard York

CSS is very flexible regarding how you call it in a document. You can include CSS in a document in four ways:

CSS can be included in a document by using embedded style sheets, which are included between tags directly in an HTML document, as demonstrated in Figure 2-26. These tags must appear between the and tags.

Figure 2-26 

CSS can be included in its own document and linked to an HTML document by using the element, shown in Figure 2-27.
Figure 2-27 

CSS can be imported from within another style sheet by using an @import rule, as shown in Figure 2-28.
Figure 2-28 

CSS can be included directly in an element in an HTML document by using inline styles with the style attribute, as shown in Figure 2-29.
Figure 2-29 

Each method has its own particular usefulness. The upcoming sections describe how you can use each of these methods to include CSS in an HTML document.